

Hygienic Wall Cladding: Trims explained
When customers are buying hygienic wall cladding, we often get asked “which trim do I need?”
There are multiple options available and here we explain the most common types of trims we sell.
Sometimes you might look at a wall and notice that the sheet and trim are different shades. When you’re buying Altro (or Hycom) wall cladding, remember that you can colour-match all the accessories including the trims, to give your project a high-quality finish.
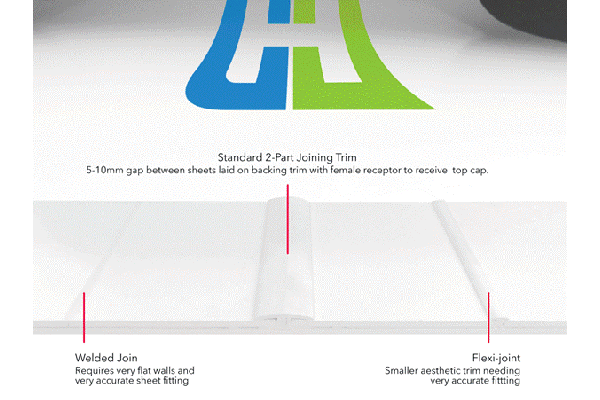
Two-part joint trim
This is a vertical joint trim used to join two adjacent wall sheets. It includes a neoprene seal to make the joint watertight. The trim consists of two separate pieces – usually a top and bottom part. The bottom part goes on the wall, the sheets slide over the top, and then the top cap clips on, to cover the join. This two-part structure allows for a cleaner finish and more flexibility during installation. It prevents moisture from getting behind the cladding, avoids buckling or warping, and provides a smooth finished look by covering panel sheet edges and reducing visible gaps.
Two-part start and edge trim
Altro trims are available in two ranges: single-part and two-part. Trims are quick and easy to install but do not have the fully sealed and flush finish required for critical hygiene applications.
Two-part trims are ideal for general purpose applications outside of critical care and secure areas. They are most commonly used on top of half height sheets, or edges of splashbacks. They create clean, finished borders at the starting and ending points or edges of the wall cladding sheets. Two-part start and edge trims hold the edges of the wall cladding securely to prevent warping, and stop moisture or dirt from getting behind the sheets, and create a seamless and tidy look.

Two-part cut tile transition trim
The cut tile transition trim covers the horizontal transition point between a sheet of Altro Whiterock and Vinyl flooring or a tiled surface, particularly when the vinyl flooring is coved up the wall, or where tiles have been cut. The trim consists of two interlocking parts: 1) The base profile, which is fixed to the subfloor or wall at the edge of the tile. It provides a stable foundation for the transition and may include a slot to accommodate the thickness of the cut tile edge. 2) The cover profile, which snaps or fits over the base, covering the tile edge or edge of the coved vinyl flooring, and providing a seamless transition to the adjacent flooring.
The cut tile transition trim provides edge protection and prevents tripping hazards by creating a smooth and level finish.
Concealed transition trim
This is a very nifty accessory! The concealed transition trim is fitted behind a sheet of Altro Whiterock, creating a gap that allows a sheet of vinyl flooring to be tucked behind. The key point here is that it allows the floor to be removed without damaging the Altro Whiterock sheet. It offers a sleek, uninterrupted look.
Internal and external corners
Internal and external corner trims are to be used when Altro Whiterock is not thermoformed. They make the 90° corner. They provide a watertight seal making them the ideal solution for use in wet areas. However, they are not suitable for use in secure accommodation where sheets should be thermoformed.
In summary
This is just a selection of the trims available for use in hygienic wall cladding and flooring projects. It is also worth noting that most trims are available as a one-part piece for anti-ligature/use in secure accommodation.
For further advice on trims or any other accessories, please get in touch with our team who will be happy to help.