

Temperature Control for Hygienic Wall Cladding
Temperature is one of the biggest drivers of successful hygienic wall cladding installation. It affects:
- How the adhesive cures and achieves full bond strength.
- How PVC sheets handle during fitting.
- How much the sheets expand or contract once the room returns to normal “service temperature”.
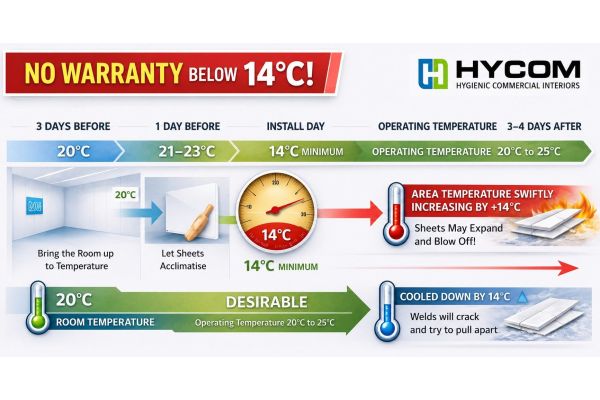
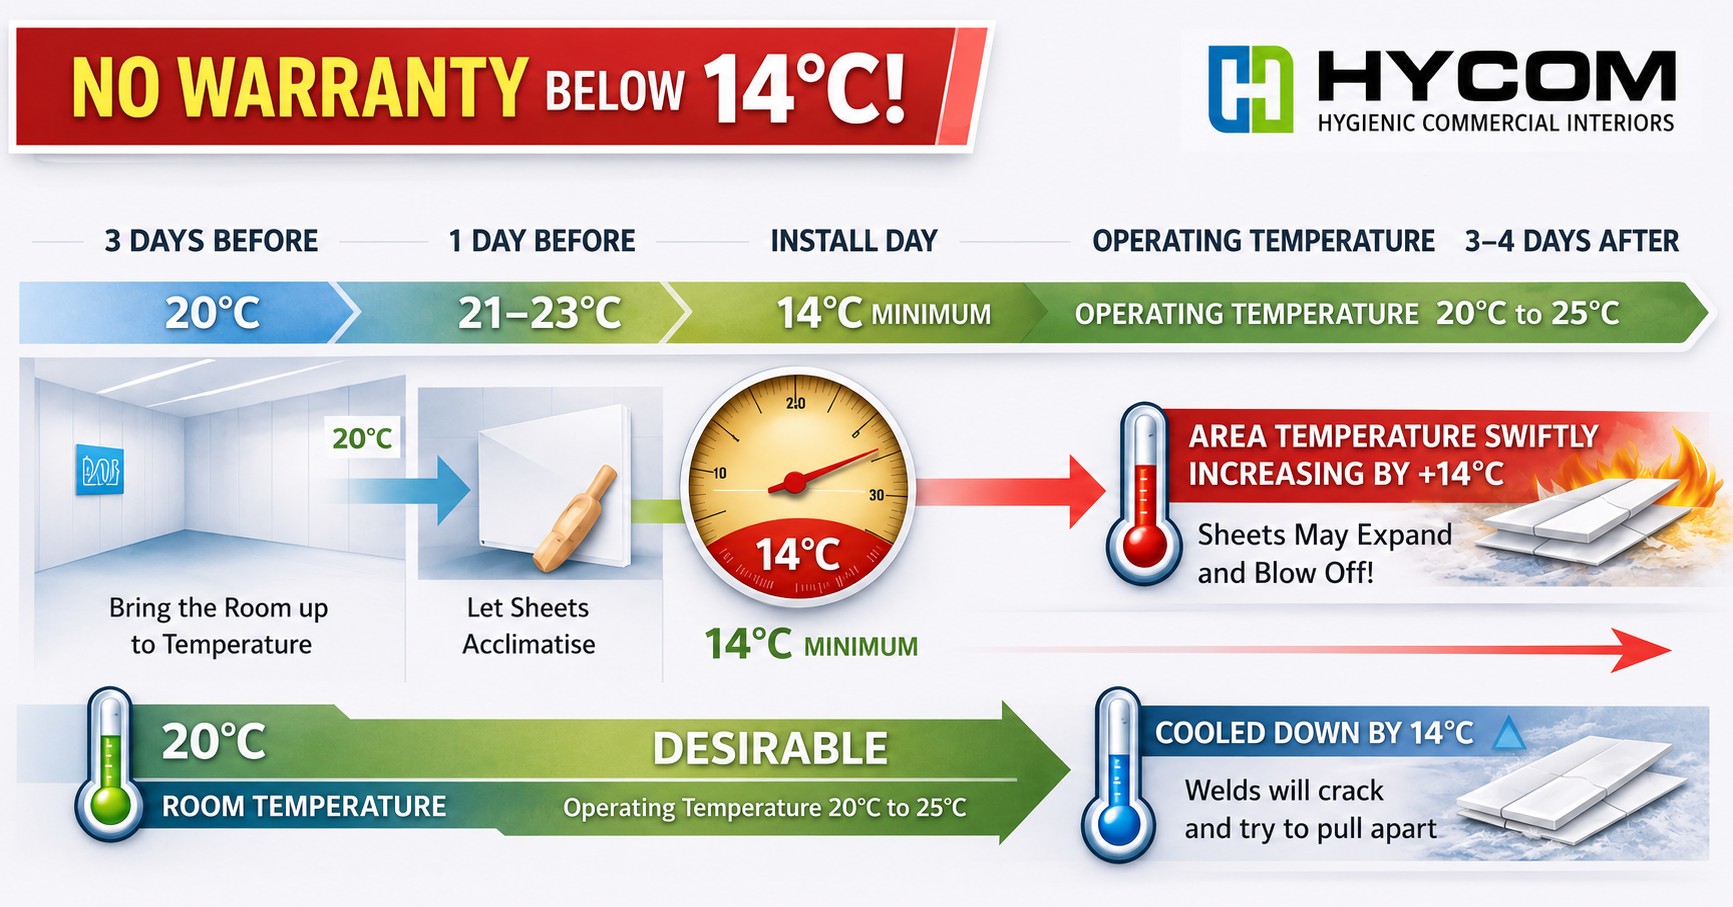
Most manufacturers specify a minimum installation temperature of 14°C, and stable conditions before and after installation. Altro, for example, recommends a minimum of 14°C in the installation area and notes that their AltroFix adhesive must not be used below 5°C. Trovex also specifies a minimum of 14°C, maintained before and after installation, to ensure adhesive cures correctly.
Failure to install products with the recommended temperatures will invalidate manufacture warranties.
We explain more in this blog post…
First: Get the room and walls to the right temperature
Don’t just heat the air. The wall/substrate and the materials need to be warm enough too, otherwise the adhesive and sheets will behave as if the room is still cold.
- Bring the room up to temperature and keep it stable.
- Let sheets and trims acclimatise in the room before fitting - this will make them easier to work with too.
- Avoid large temperature swings (for example heaters on/off, doors open, cold drafts).
The technical bit:
- Minimum installation area temperature: 14°C (common manufacturer requirement).
- Aim to install at (or close to) the area’s service temperature (the temperature the room will operate at once complete).
- Typical guidance includes maintaining stable conditions for a period before, during and after installation; manufacturer documents commonly reference 24 - 48 hours either side (project/spec dependent).
- Pre‑conditioning sheets in the room for around 24 hours is commonly specified so they reach ambient temperature.
Next: Make sure the adhesive cures as designed
Adhesives are chemical systems. If it’s too cold, they don’t wet out and cure properly. If it’s too hot, they skin/cure too fast and you lose working time.
What you’ll see when it’s wrong:
- Cold: thick glue, poor spread, patchy transfer, weak grab.
- Hot: adhesive “goes off” too quickly, limited open time, uneven bond.
The technical bit:
Many wall cladding systems specify a working range of around 14°C to 27°C to protect open time and cure behaviour. Alwways follow the adhesive technical datasheet.
- Altro guidance highlights a minimum of 14°C in the installation area.
- Storage temperatures matter: adhesives are commonly specified for storage within a bounded range (manufacturer dependent).
- Moisture and temperature are linked: if the substrate is at or below dew point, condensation can form and compromise adhesion. Best practice used across coatings/flooring industries is keeping the substrate temperature at least ~3°C above the dew point to avoid risk of condensation.
Finally: Control PVC expansion and movement
What this means in plain English
PVC moves with temperature. If you install when it's too cold, when the room heats up, the sheets will expand and push against joints and trims. Basically, they’ll pop and blow!
What can happen if it’s installed cold:
- Bubbles or ripples.
- Stressed joints/opened seams.
- Sheets pulling at edges or around penetrations.
- Visual distortion around trims and weld areas.
The technical bit:
- Rigid PVC has a relatively high thermal expansion compared with many building substrates. A typical coefficient is around 6.7 × 10⁻⁵ per °C (order of magnitude guidance).
- The rule of thumb from published PVC property data: roughly 7mm movement over 10m for a 10°C change (material and formulation dependent).
- This is why stable conditions and installing near service temperature reduces stress locked into the system.
Condensation and moisture (the hidden failure mode)
What this means in plain English:
Cold walls can attract moisture from the air. Even a thin film of condensation can stop adhesive bonding properly.
Simple checks
- The substrate must be dry and sound.
- Newly plastered walls must be fully dried/cured before cladding.
- Use a moisture meter where required by spec.
The technical bit
- At Hycom, we choose the SurveyMaster Protimeter. This is a dual-function moisture meter with both pin and non-invasive measurement capabilities. It’s easy to use and provides instant readings in a wide range of buildings.
- Dew point matters: if substrate temperature drops below dew point, condensation can occur. Many technical guides recommend maintaining a buffer (commonly ~3°C) between substrate temperature and dew point during application and cure.
The Hycom site rule
Maintain 14°C minimum and stable conditions, with time for:
- The room and substrate to warm through.
- Materials to acclimatise.
- The adhesive to cure properly.
- If in doubt, measure the substrate temperature (not just air temperature) and control drafts and heat cycling.
A final recap
Maintaining the correct temperature control is a vital step in achieving a high-quality and durable installation. Failure to meet these requirements can lead to reworks, delay, increased costs and no warranty.
But this is all easily avoidable by planning properly. If you’re unsure about the site conditions for your install, please get in touch with our team and they’ll be happy to help.


